


How to Add Toe Kick Lighting The Right Way?
What Is Toe Kick Lighting?
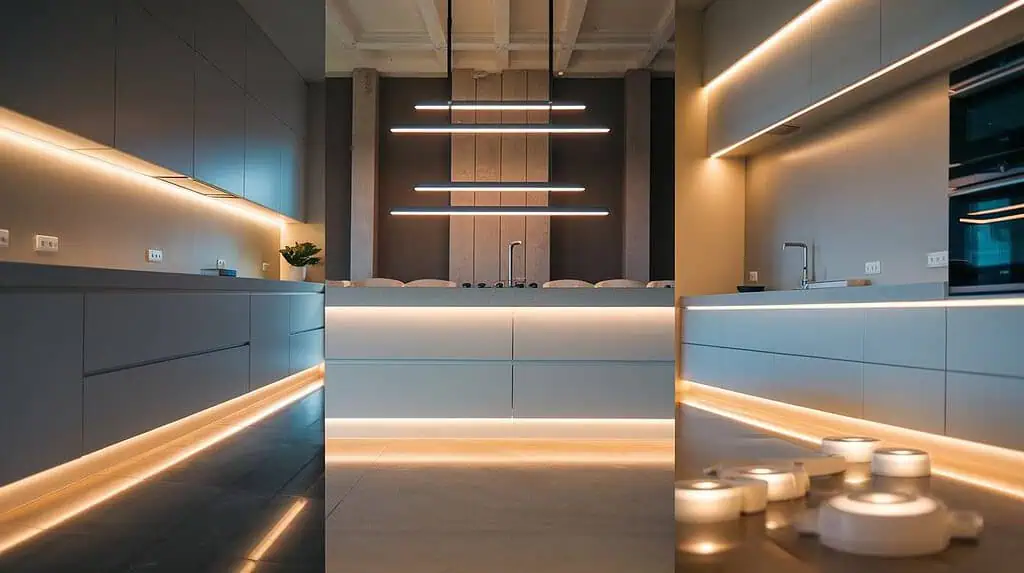
Toe kick refers to the area under the cabinets or furniture where your feet fit. The slim-fit fixtures used in these spaces are known as toe kick lights. This makes your space look more exquisite. Besides, lighting in these narrow spaces can bring an illusion of space. This makes toe kick lights a fantastic choice for bathroom, closet, or kitchen cabinets.
Toe kick lights further work great as task lighting. For instance, it helps you navigate the kitchen or stairs at night without turning on the overhead lights. These lights also help you clean underneath spaces and find things that have dropped on the floor. Thus, toe kick lights add functionality and beautify your space.
Types of Toe Kick Lights
As toe-kick areas are narrow and congested, slim and flat fixtures are usually used as toe-kick lights. The most common variants used are as follows:
1. LED Strips
The flexibility of LED strips makes them the most popular option for toe kick lighting. These super flat fixtures fit into any narrow space of your cabinet. You can easily cut them to fit your desired space. Adobe all, these slim-fit fixtures are bendable. This allows you to install them on any corner or curve of the toe kick area.
2. Bar Lights
LED bar lights are flat LED lights with a bar-like structure. You can easily DIY these lights using LED strips inserted into aluminum profiles, which give the light robust protection. Bar lights are suitable for bathroom and kitchen toe kick areas.
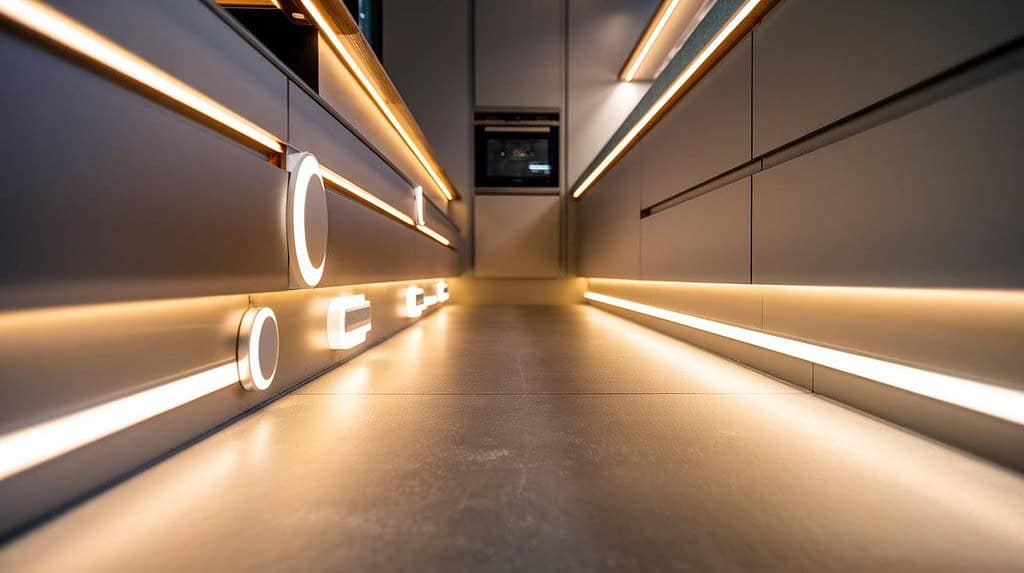
3. Puck Lights
Puck lights are small fixtures similar to recessed lights. They seamlessly set into the surface, giving your toe kick area a neat appearance. These lights are available in different sizes and shapes. For toe kicks, choose smaller puck lights to get the best result.
4. Integrated Lights
Integrating toe-kick lighting is the best solution if your house is under construction. You can create built-in toe kick lighting under your kitchen, bathroom, or bedroom cabinets. This will enhance your interior’s appearance without the hassle of separate lighting hassles.
What You Will Need to Install Toe Kick Lighting?
The requirements for installing toe kick lighting may vary based on the type of light you choose. Yet, here is some basic equipment that every toe kick light installation requires-
- Light fixture- LED strip, bar light, or puck light
- Measuring tape
- Wires
- Scissors (for cutting LED strips, if needed)
- Connectors (if you use LED strips)
- Drill machine, screw, and clips
- Cleaning supplies (damp cloth, rubbing alcohol)
- Power source
How to Install Toe Kick Lighting?- Stepwise Guide
Installing toe kick lighting is quick and straightforward. You can go for a DIY toe kick lighting following the below steps:
Step 1: Clean & Prepare The Installation Area
Clean the toe kick area properly before placing the lights. Wash the floor and the surface beneath the cabinet with rubbing alcohol and a cloth. These narrow spaces are usually dirty. If not properly cleaned, the light fixture will not be set properly, especially when using adhesives. So, clean and dry them thoroughly before moving to the next step.
Step 2: Take Measurements & Drill Pilot Holes
Take your measuring tape and mark the places where you want to install the lights. Consider the number and size of the fixture to decide on the spacing. However, if you are using an LED strip, measurement is simple! All you need to do is cut the LED strip light equal to the length of your toe kick space. A plane scissor will do the work; follow this guide for directions- Can You Cut LED Strip Lights and How To Connect: Full Guide.
Drill pilot holes on the marked points. Don’t end up drilling too deep that the screw comes out. However, adhesive will work if you use LED strips; drilling is not essential. For additional security, you can use screwing or clipping methods. Check this article for more information on LED Flex Strips: Mounting Techniques.
Step 3: Install Toe Kick Lighting Fixtures
Place the fixture in the exact position and screw them with a screw. Press the fixture to set it on the surface if you use adhesive backing. You can start wirings by connecting all the fixtures to series or parallel circuits. Besides, if you are using LED strip lights, it is possible to join multiple strips using LED strip connectors. This cancels out the length limitation. However, you can also go for soldering for a robust connection.
Step 4: Turn On The Power And Enjoy Your New Toe Kick Lighting!
Once you are done with mounting the fixture, it’s time to connect them to the power source. In this case, maintain the polarity. That is, connecting the light fixture’s positive end to the power source’s positive terminal and the negative to the negative. But how will you identify the polarity of light? Read this- What is the Polarity of LED lights? Turn on the switch, and the light will glow if the wirings and polarity are maintained.
Facts To Consider For Picking The Right Toe Kick Light
1. Shape & Size
Puck lights can be oval, round, or square-shaped. As the lights remain hidden, the shape won’t matter, but the size is a fact to consider. Go for multiple puck lights of small sizes. These will bring consistency to the lighting. However, consider the length and width of the bar lights to match your toe kick space. Length is not a headache if you are using an LED strip light. As per the width concerns, they are available in various sizes. They can be as thin as 2mm-5mm; check out our ultra-narrow LED strip series to learn more!
2. Number/ Length of Light
The number of required lights depends on the length of your toe kick space, brightness, and fixture size. However, the number of lights depends on your fixture type.
- For Puck Toe Kick Light:
You must maintain a definite spacing between the lights while using a puck light for the toe kick area. Usually, 12 to 24 inches (30 to 60 cm) spacing is used depending on the desired brightness and the intensity of the lights. Remember, for a higher lumen rating, you will need fewer lights. Keep all these facts in mind while deciding the spacing. Here is the general rule to find the required number of light:
| Number of Lights = (Total Length ÷ Spacing) +1 |
For example, the length of toe kick space is 120 inches, and your desired spacing is 18 inches. So, the required number of lights will be (120÷18) inches+1 = 6.67≈7 lights; you will need seven lights.
- For Bar Toe Kick Light:
Bar lights are usually long in size. You need to consider its length to figure out the required number of fixtures. The formula here goes as follows:
| Number of Lights = (Total Length ÷ Length of Each Light) |
Suppose the toe kick space is 120 inches, and the length of each light is 12 inches. So, you will need (120÷12) = 10 bar lights.
- For LED Strip Light:
LED strips don’t come as individual fixtures; instead, they come in reels. Here, you need to consider the LED density and number of reels you need. Usually, each reel consists of 5m of LED strips. All you need to consider is the length of the toe kick space and install the LED strips accordingly.
| Length Of LED Strip = Length Of Toe Kick ( equal or close to equal) |
For example- if your toe kick space is 120 inches, you will need nearly 120 inches of LED strip. Now, 120 inches is approximately 3.05 meters. So, buying a 5m/reel LED strip will be enough. You can simply cut the additional strips to fit the space. And if you need longer strip lengths, get more LED strip reels and connect them. Besides these 5m/reel strips, LED strips are available in various lengths. Check this to learn more- LED Strip Length: How Long Can They Actually Be?
Besides, the density of the LED strip light is also a crucial factor here. Remember, a higher-density LED strip is a must for a seamless effect. If you use low-density LED strips, they will create hot spots that will run the ambiance of your space. But if you have already bought a low-density LED strip, no worries. Using a diffuser, you can avoid the hot spot issues and thus bring seamless toe kick lighting. Check this guide for help: How To Choose An LED Diffuser For Light Strips.
3. Power Source
Toe-kick lights can be battery-powered, plug-in, or hardwired. If you want a quick solution with no power connection hassles, the battery-powered option is good to go. However, these are not long-lasting solutions; you will need to replace them frequently.
Plug-in toe kick lights are a better alternative to battery-powered lights. This eliminates the wiring steps; simply plug the light into the power source, and it will glow. Again, hardwiring is the best option if you want a permanent electrical connection. However, this requires professional installation, making the process expensive.
4. Light Color
To decide on the light color, you need to focus on the function and ambiance of the space. Warm lights are the best choice if you are lighting up the toe kick area of your bedroom, living room, or residential space. This brings a cozy vibe to your space, making you feel more at home. Again, cool lighting is preferable for office or task lighting spaces. Yet you can go for warm lights too if that matches the ambiance.
However, I suggest you go for tunable lights for the best outcome. This allows you to adjust the lights from warm to cool hue per your mood. Nevertheless, options for colorful lights are always open. For instance, you can choose an RGB LED strip that matches your interior decoration.
5. Brightness
Toe kick lights are usually used as accent lighting. So, too much light is never favorable for this purpose. The intention is to bring a soft glow yet with proper visibility. You can go for a fixture with 150 – 250 lumens per foot for toe kick lighting. But 75 – 150 lumens per foot will be ok if you want more dimmed illumination.
6. IP Rating
When lighting for bathroom or kitchen toe kick lighting, IP rating is a crucial factor to consider. These spaces often come in close contact with water, especially the toe kick area of the bathroom. So, to ensure your fixture remains safe, you need to purchase bulbs with higher IP ratings. If your toe kick lights are close to the floor, IP65 is the safest option. For further research, read this: IP Rating: The Definitive Guide.
Where To Add Toe-Kick Lighting Around Your Home?
You can add toe-kick lighting to cabinets or furniture that has hidden lighting spaces underneath. The most common toe-kick lighting options are as follows-
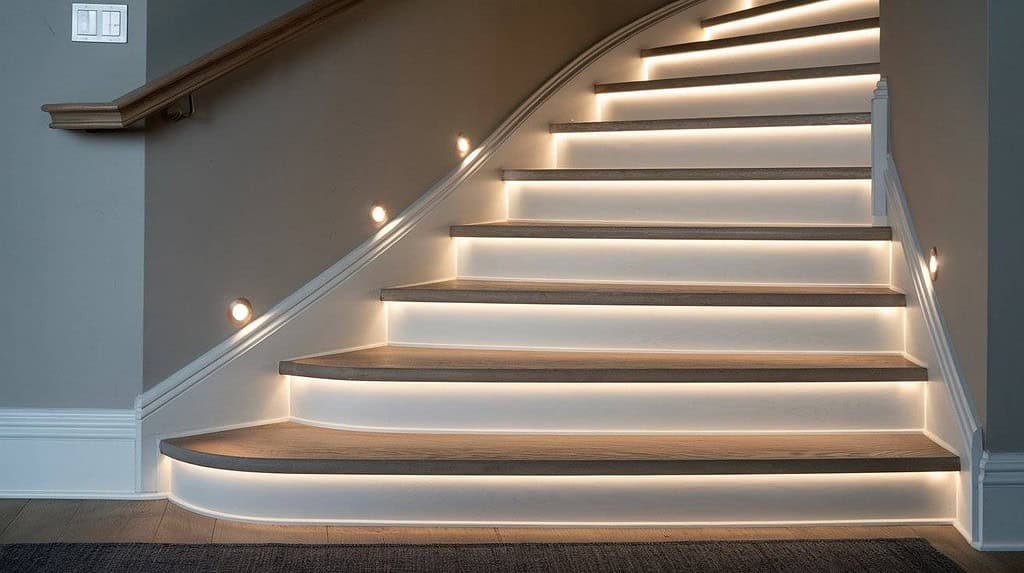
Stairs
The steps underneath the stairs are good to go for toe-kick lighting. LED strip lights are the best option for this purpose. These fixtures’ slim and flat structure perfectly fits the narrow space beneath the steps. Besides, if you have hanging stairs, you can create an outstanding floating effect with LED strips. For more ideas, check this- 16 Stair Lighting Ideas With LED Strip Lights (2024).
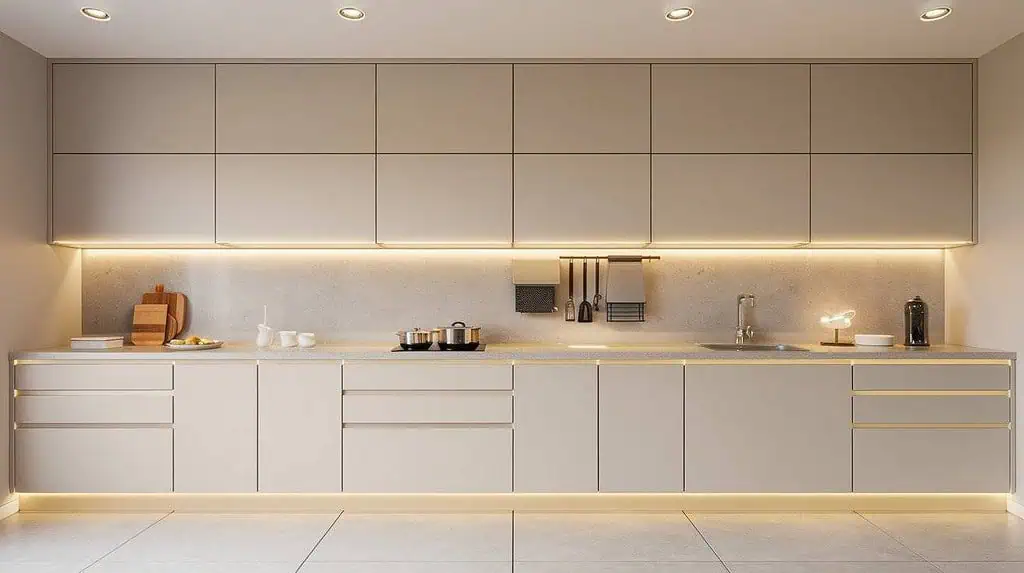
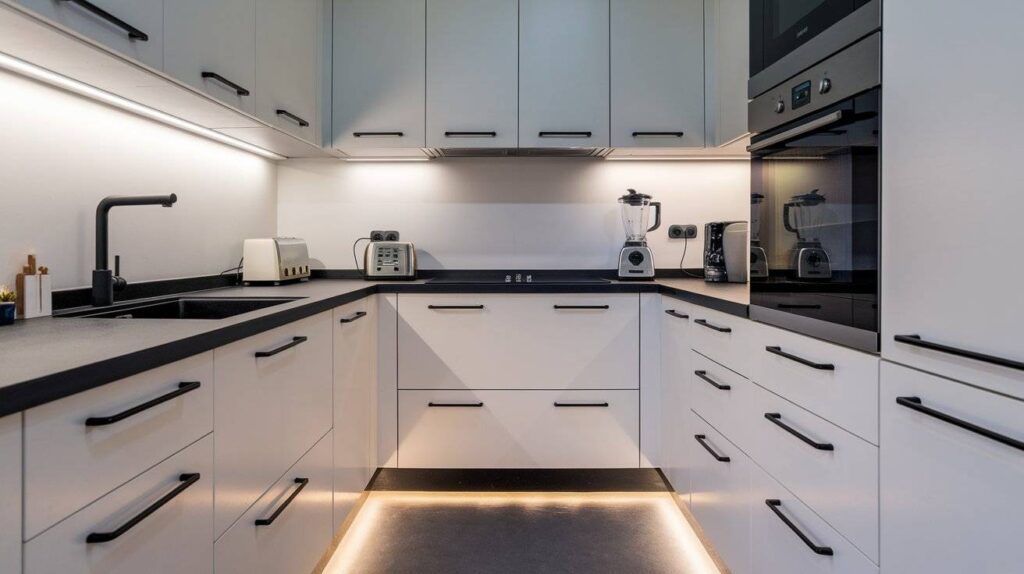
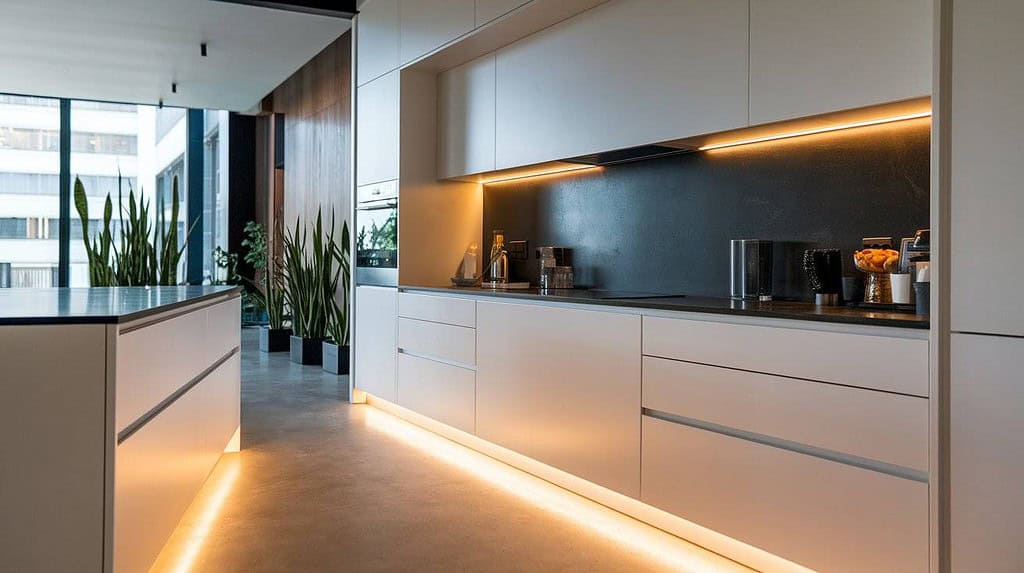
Kitchen
The space under the kitchen cabinets, islands, or fridges is a good option for toe-kick lighting. Besides white lights, you can also use colorful lights to pop up the space. For instance, a sky blue toe kick light will give your kitchen a fun vibe. This guide will help you pick the best lights for your kitchen: How to Choose the LED Strip Lights for Kitchen Cabinets.
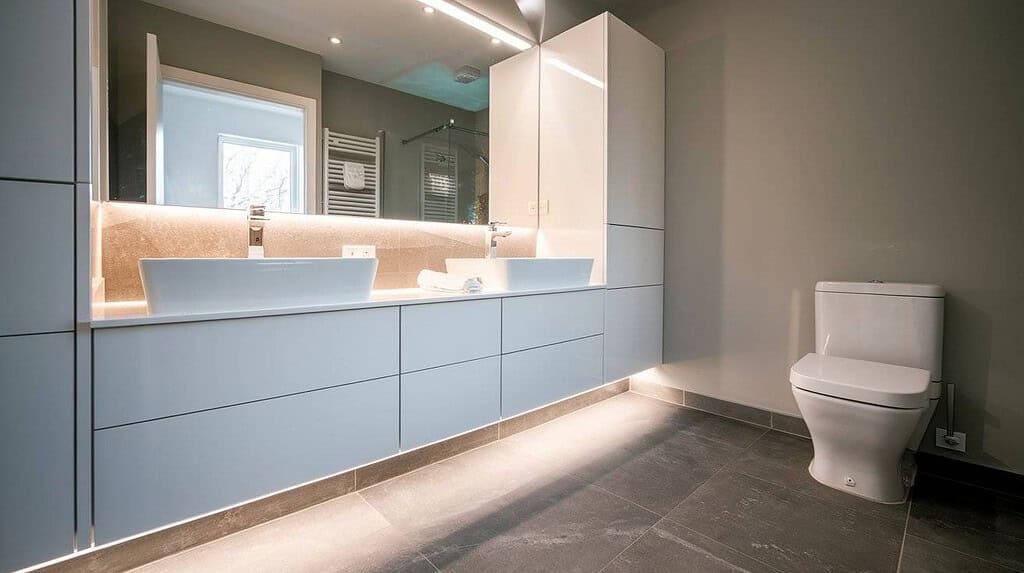
Bathroom
Adding toe-kick lights beneath your bathroom vanity makes the space look exquisite. If you have a small bathroom, these lights can make it look bigger by creating an illusion of space. Apart from the vanity, if you have any cabinets in your bathroom, you can also add toe-kick lights under them. For more ideas, check out this: Top 26 Creative Bathroom Lighting Ideas (2024).
Bedroom
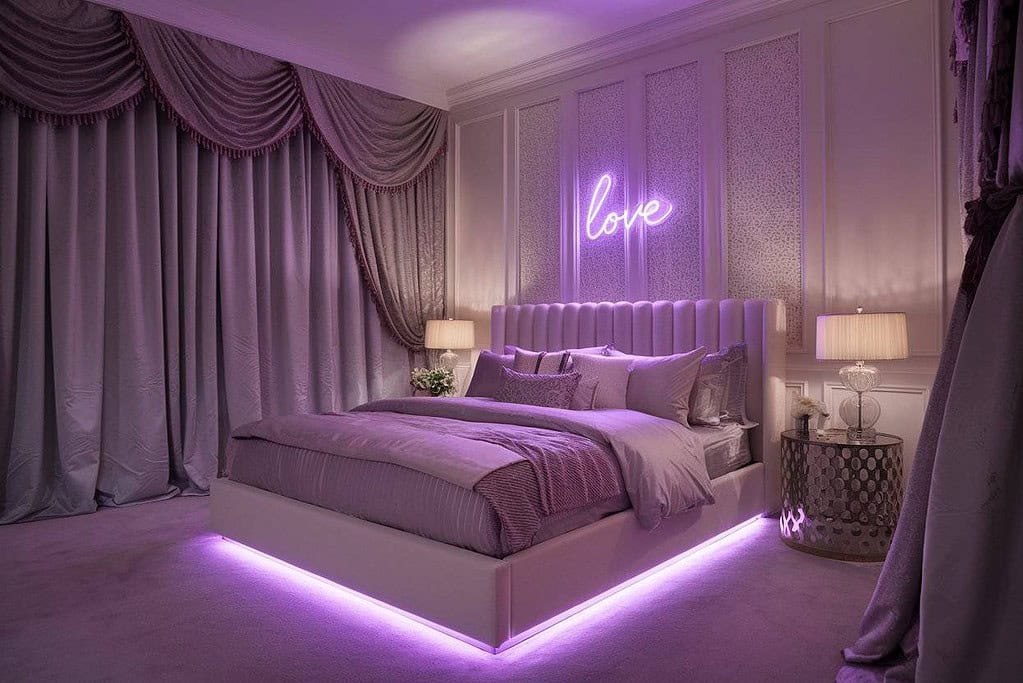
The bedroom opens up multiple options for adding toe kick lights. You can install them under your bed, below the closet, vanities, and other furniture. For bedroom toe kick lighting, dim-to-warm LED strip lights are an excellent option. You can use them as accent lights to enhance the beauty of your space. Besides, the soft, warm glow of the lights aids in improving the sleep cycle. Read this guide for more bedroom lighting ideas- 35 LED Strip Ideas for the Bedroom (2024).
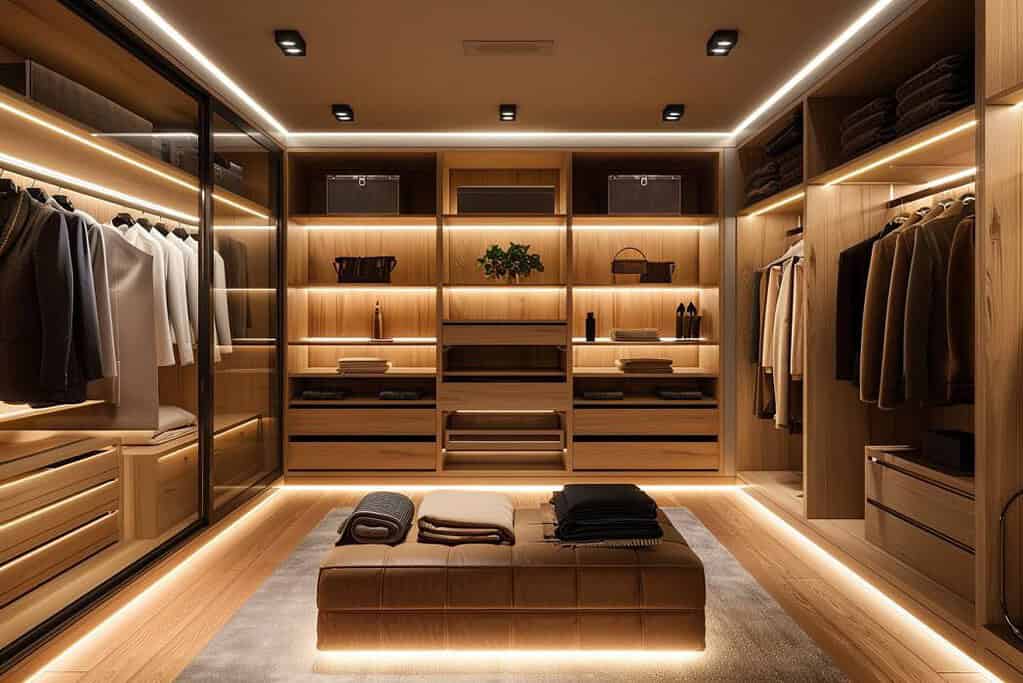
Closet Lights
Motion sensor toe kick lights are great for closet lighting. You can add them under the closet or install them beneath the shelves and drawers. This will help you find your clothes easily. If you have a walking closet, try installing the lights beneath the shoe racks and other cabinets.
Under Cabinet Lighting in the Kitchen
Want to add some fun to your kitchen lighting? Add toe-kick lights under the kitchen cabinets and see the magic! This will beautify your kitchen and help you clean the kitchen floor or find any item that falls under the cabinets. You can also add these lights under your kitchen island or at the center table. To pick the right light, read this: Under Cabinet Lighting Guide.
The Multifaceted Advantages of Toe Kick Lighting
Elevating Home Aesthetics
Toe kick lights act as accent lighting, making your home look more elegant. You can include these lights underneath the furniture or cabinets of your bedroom, bathroom, kitchen, office, and more. Thus, it will take your interior decoration to the next level.
Navigating Safely with Subtle Illumination
The subtle illumination of toe kick lights aids in safe walking at night. For example, if you suddenly wake up from sleep at night, the toe kick lights under your bed will guide you to the washroom without turning on the overhead light. Again, installing these lights under stair steps will ensure proper visibility and save you from tripping down stairs.
Energy Efficiency and Cost-Effectiveness
With LED toe kick lights, you will get an energy-efficient lighting solution. For safety lighting stairs, there is no need to turn on the high-power overhead lights for the whole night. These toe kick lights will provide sufficient illumination and save you electricity bills.
Easy Installation and Minimal Maintenance
Installing LED strip lights is super easy. All you need to do is take a pill of the adhesive backing and paste it on the toe-kick areas. It will illuminate once you power it up. Thus, you do not need a professional electrician to install these lights. This further requires no maintenance or additional care.